Pre-Launch Checklist
Overview
Here are some items you may want to check one final time before your website goes live.
Proofread content
Before your website goes live, we recommend doing a final proofread. Even if you’ve practically memorized your content by this point, here are a few tricks for approaching your content with fresh eyes:
- Copy and paste your text into another application such as Word or even into an email message: reviewing your text in a different visual context can help jog your brain
- Print out your content and then review the printouts
- Read your content out loud or use a voice-to-text application
- Enlist a coworker or two to review your content
Check permalinks (URLs)
WordPress generates a page’s permalink—aka its URL—automatically and based on the initial title you gave the page.
You can manually shorten or update this URL: link brevity and accuracy is helpful to website visitors and search engines. If you update a URL, make sure that any other pages linking to it are linking to the updated URL.
To prevent confusion for site visitors, try not to change a page’s URL after it’s been published.
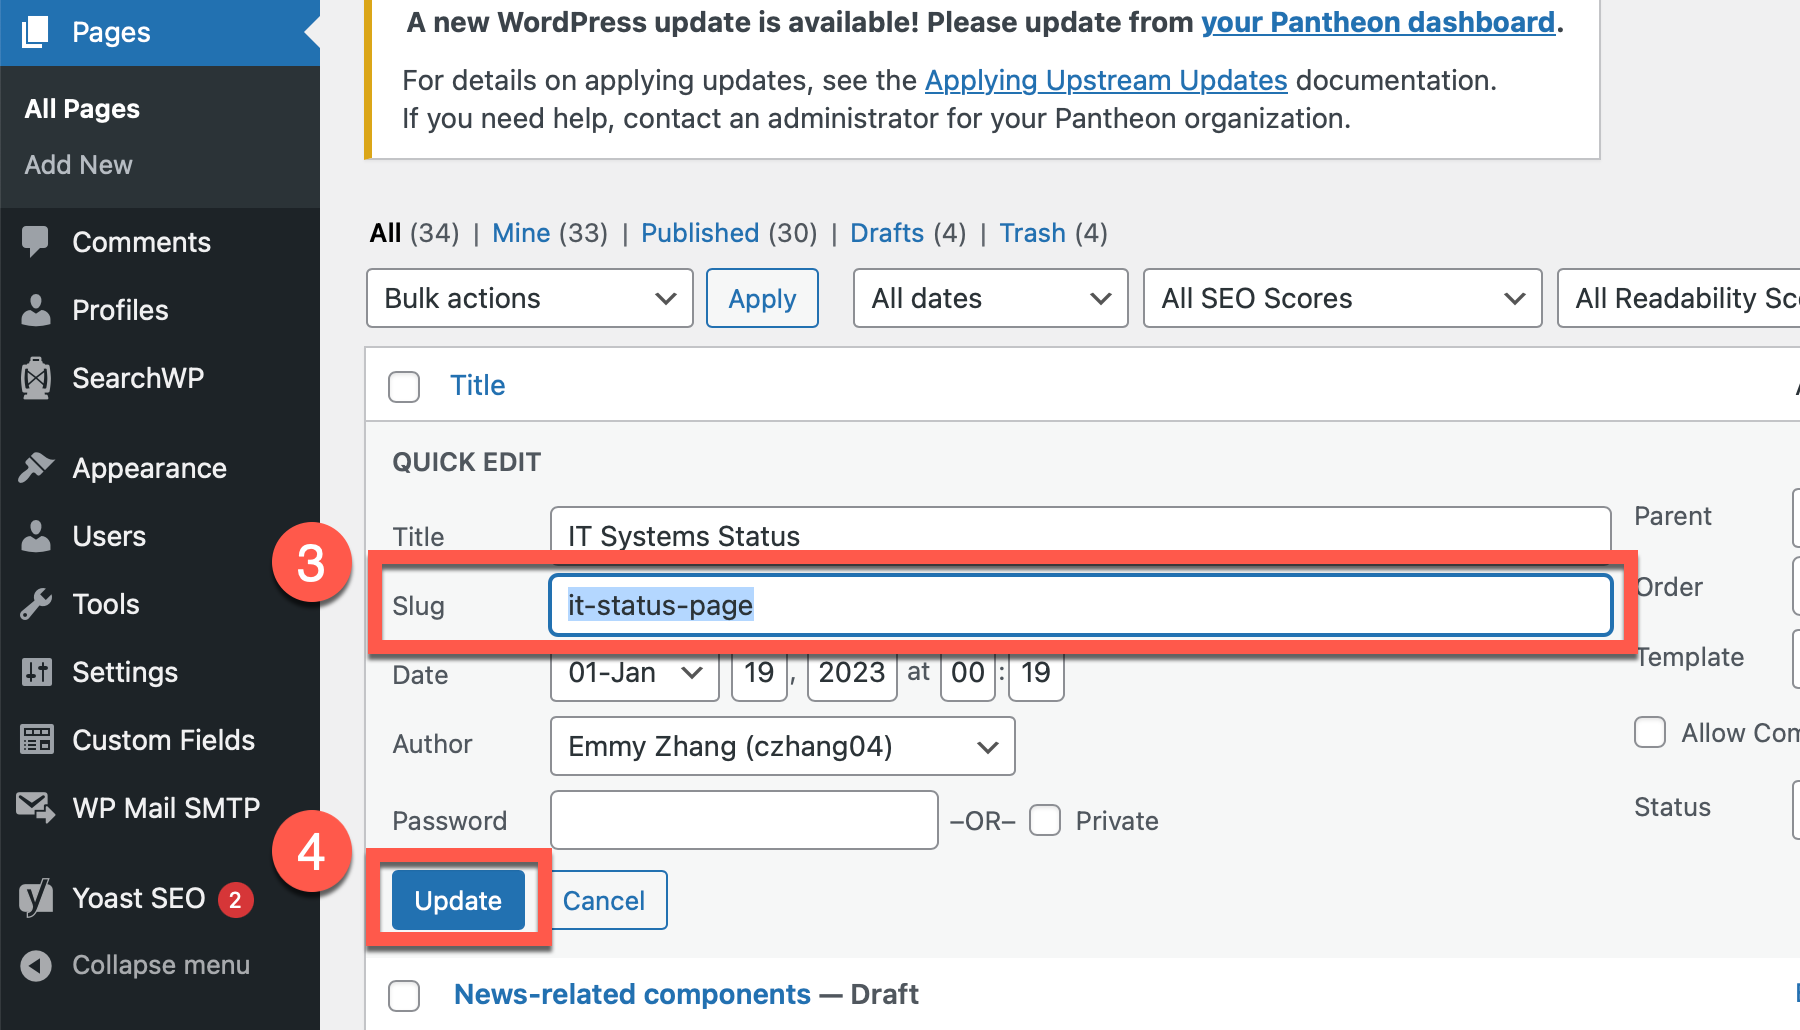
To view and edit permalinks
- In the left menu, click Pages.
- Hover over any title and click Quick Edit.
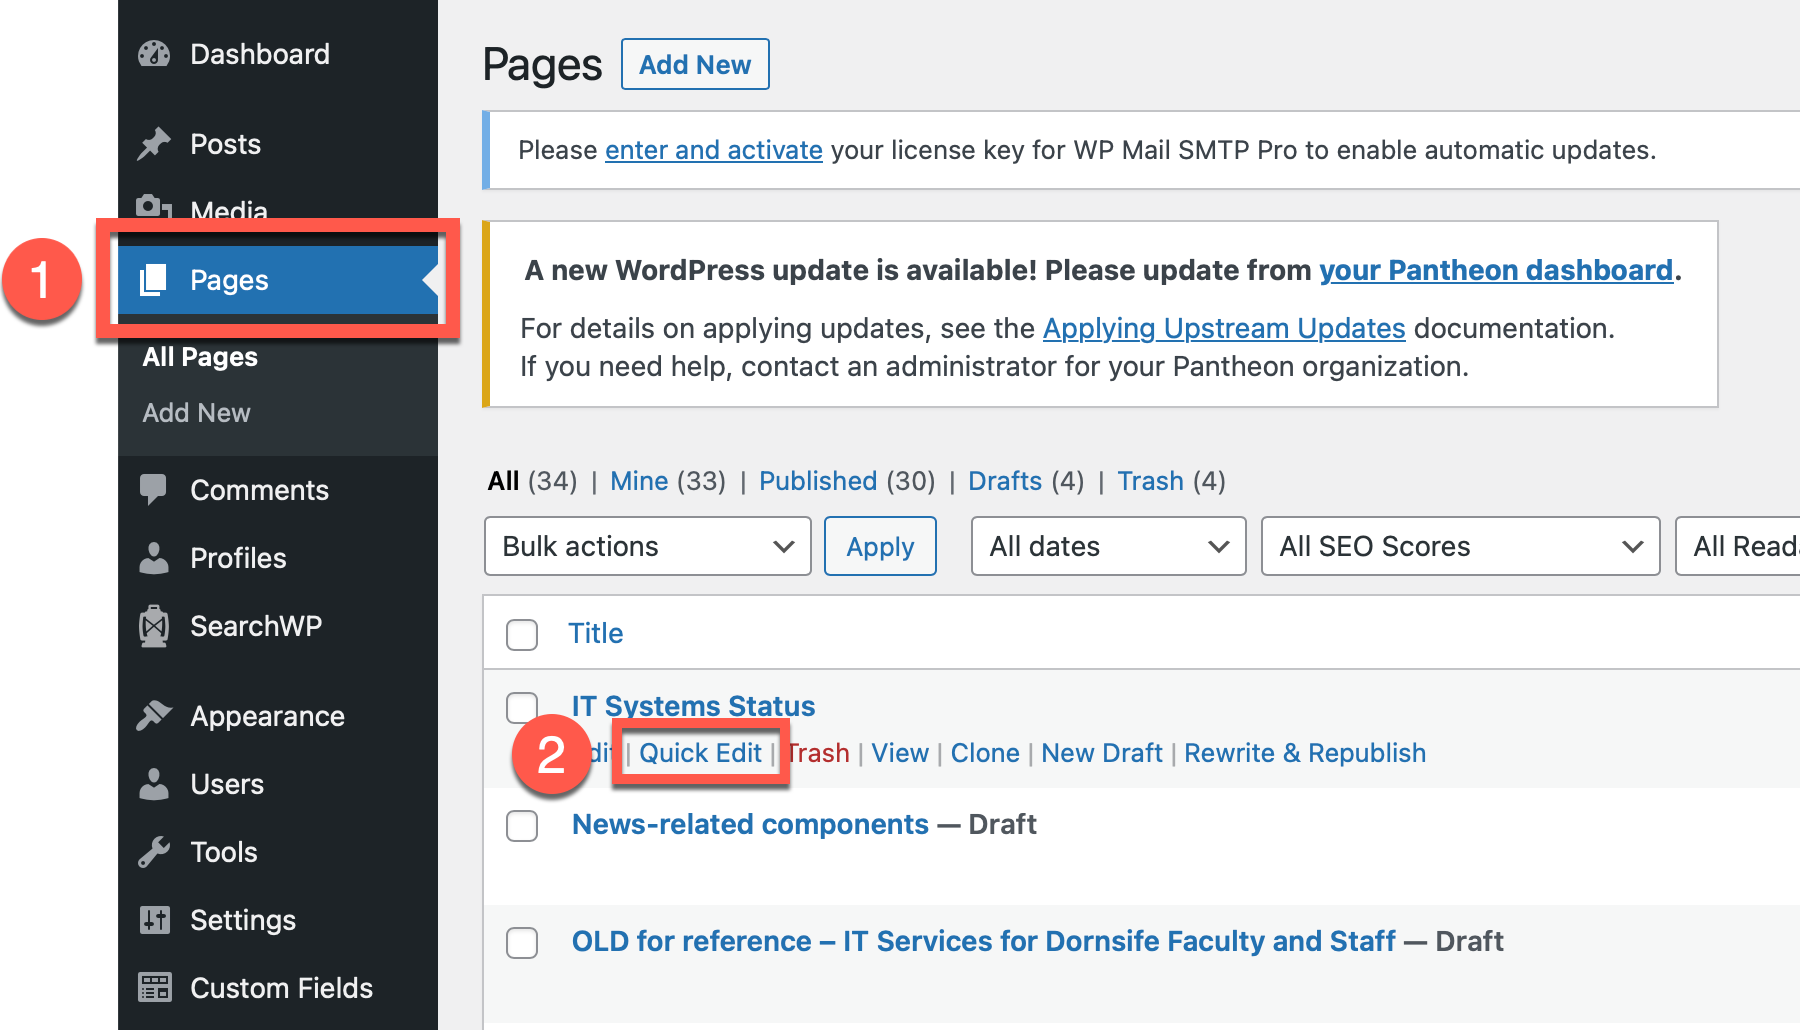
- Edit the Slug field. We recommend keeping it short and using a hyphen to separate words.
- Click Update once you’re done.
- Repeat steps 2–4 for any other pages where you need to update the URL.
You can also update the permalink when editing an individual page:
- Default and Content Detail templates: In the Settings sidebar, select the Slug field.

- All other templates: The permalink appears at the top of the page. Click Edit.

Ensure all images have alternative text
Website visitors with low vision may not be able to see images, so adding alt text—descriptive text that a screen reader can read out—makes your content accessible to them. As a bonus, alt text makes your website more visible for search engines.
For more information, refer to our guide for adding alt text.
To view and add alt text directly to a page
If you are uploading an image directly to a page, then you can add alt text at the time of upload or within the page.
- Open the editor and locate the image.
- If using Rich Text component:
- Click the image to select it, and select the Edit icon (looks like a pencil).
- Type a description in the Alternative Text field.
- Click Update.
- All other components:
- Hover over the image, and click the Edit icon (looks like a pencil).
- Type a description in the Alt Text field.
- Click Update Image.
- If using Rich Text component:
To view and add alt text in the Media Library
If you did not add alt text when you uploaded the image, you can do so afterward in the Media Library. Be aware however that updating the alt text in the Media Library does not update the alt text on pages where the image was already added.
- In the left menu, click Media.
- Click an image to open it.
- Type a description in the Alternative Text field.
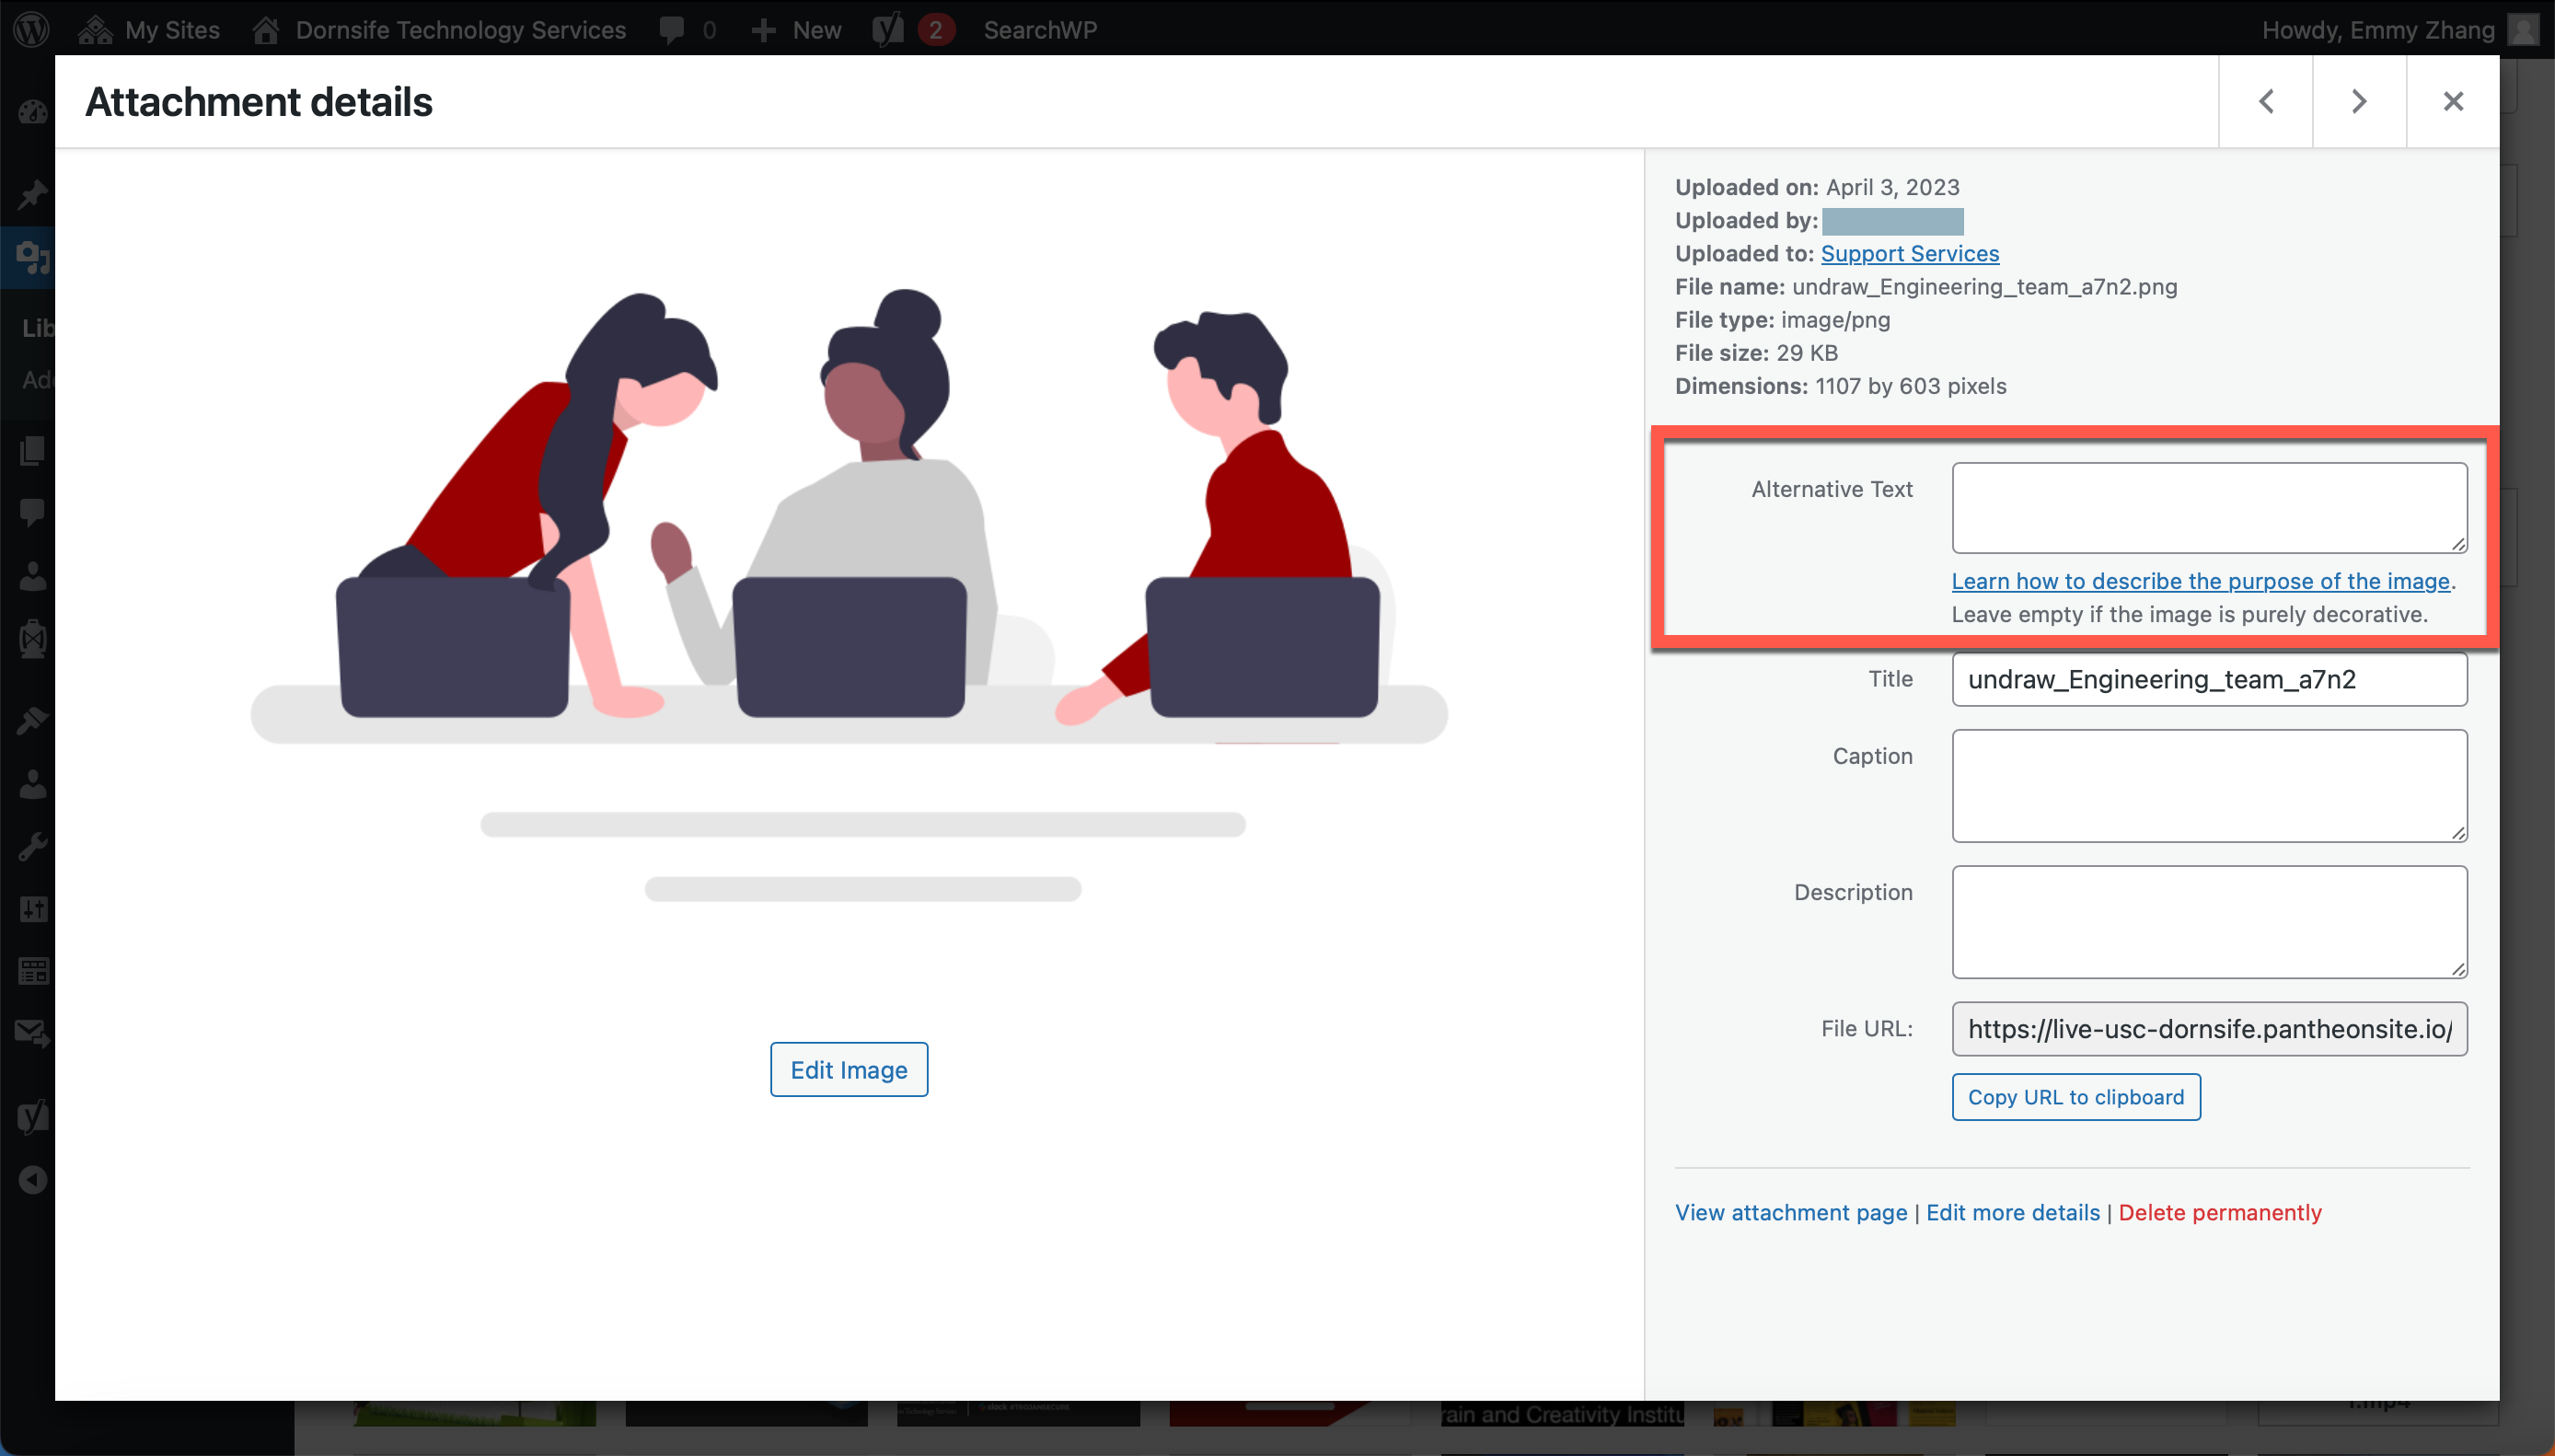
- Click X to close the window. Your alt text automatically saves, and will be included anytime you add the image to a webpage.
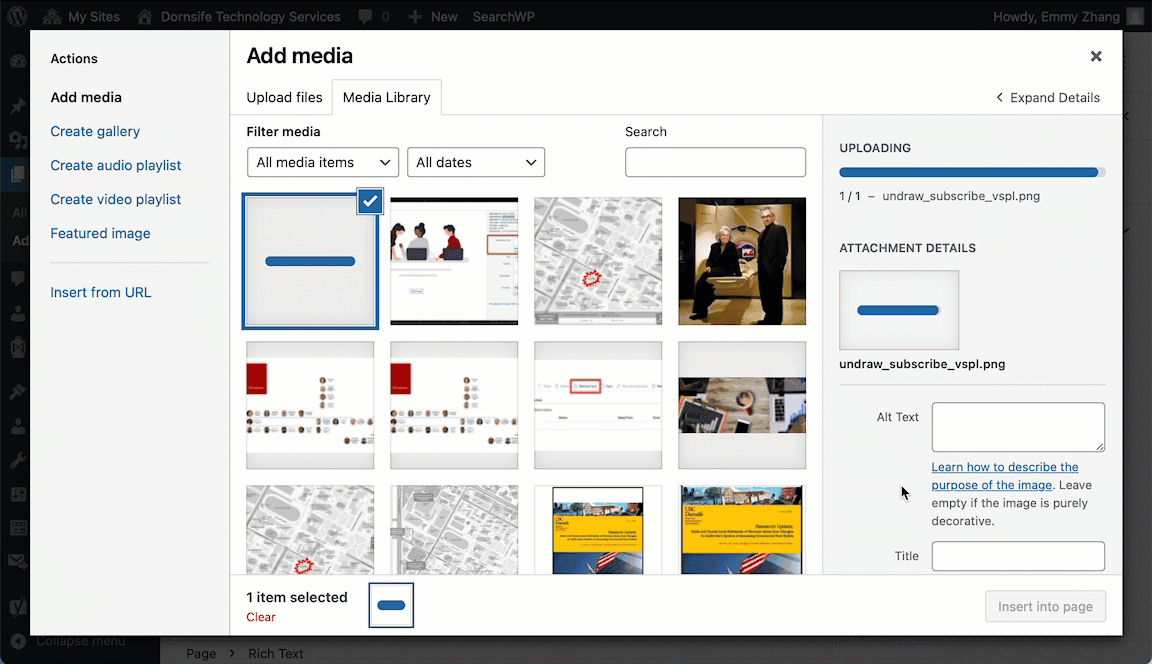
Tip: When you upload an image directly to a page, you must first wait for the blue loading bar to disappear. Then, you can fill out the Alt Text field.
If you start filling out the alt text while the blue loading bar is still present, your alt text will disappear once the image finishes uploading:
Open external links in a new tab
External links direct the website visitor to another website, while internal links keep the website visitor within dornsife.usc.edu.
Examples of external links (links go outside dornsife.usc.edu):
- https://moz.com/learn/seo/alt-text
- https://twitter.com/uscdornsife
- https://viterbischool.usc.edu/
Examples of internal links (links are within dornsife.usc.edu):
- https://dornsife.usc.edu/news/
- https://dornsife.usc.edu/administration-finance/
We recommend setting external links to open in a new tab, to avoid interrupting the website visitor’s flow.
To set an external link to open in a new tab
- Select the link and click the Edit icon (looks like a pencil).
- Make sure that Open link in a new tab is selected.
- Click Add Link.
Publish completed pages
Make sure that all pages that are complete are published. If pages are still in draft mode, website visitors will see an error message when they try to view it.
To publish a page
- In the left menu, click Pages.
- Drafts are indicated with the label “— Draft” after the title.
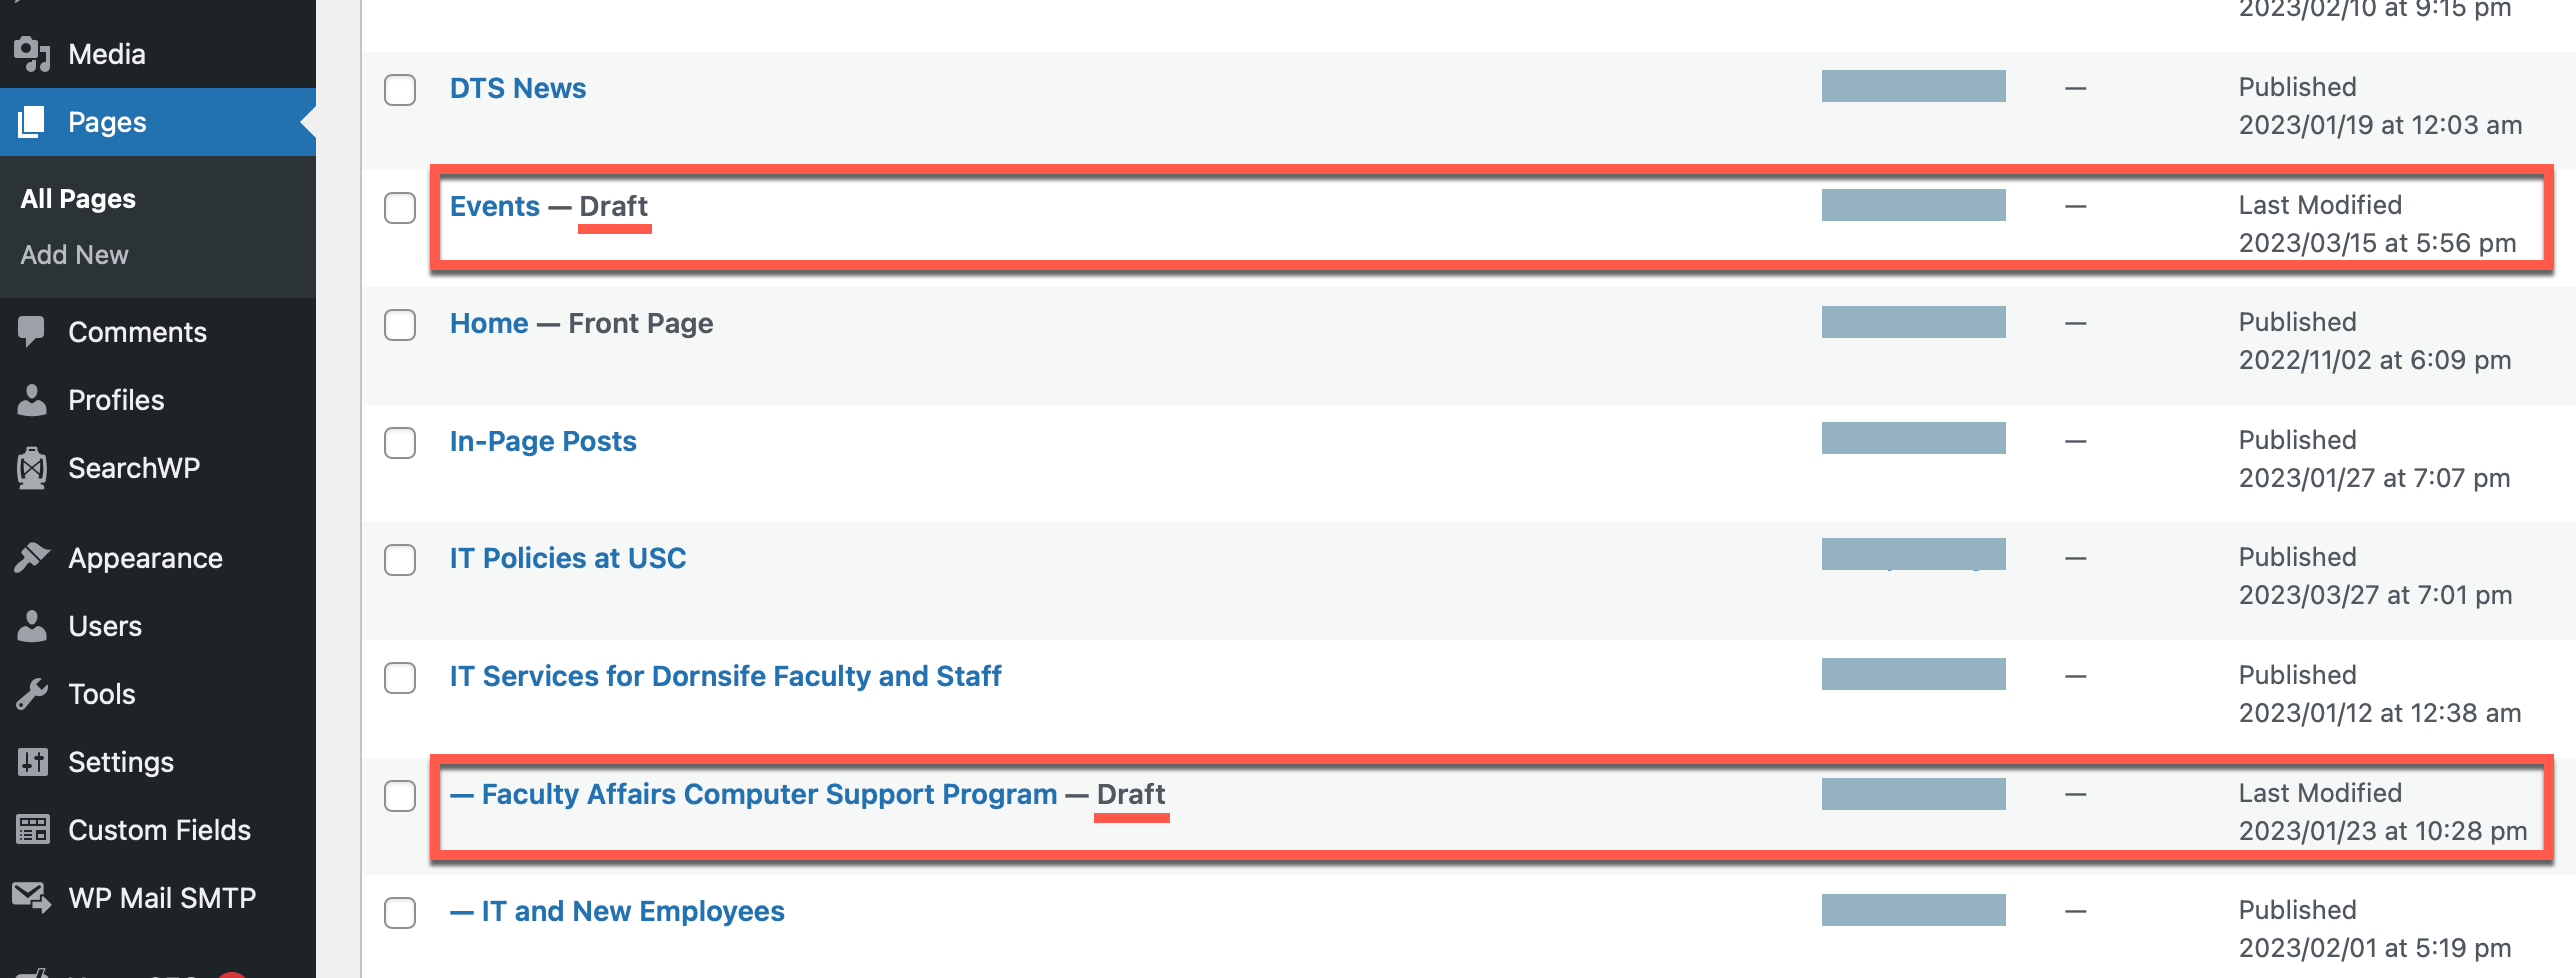
- If a draft is ready to go live, you can publish it without opening it in the editor:
- Hover over the title, and click Quick Edit.

- In the Status field, click Draft and select Published.
- Click Update.

- Hover over the title, and click Quick Edit.
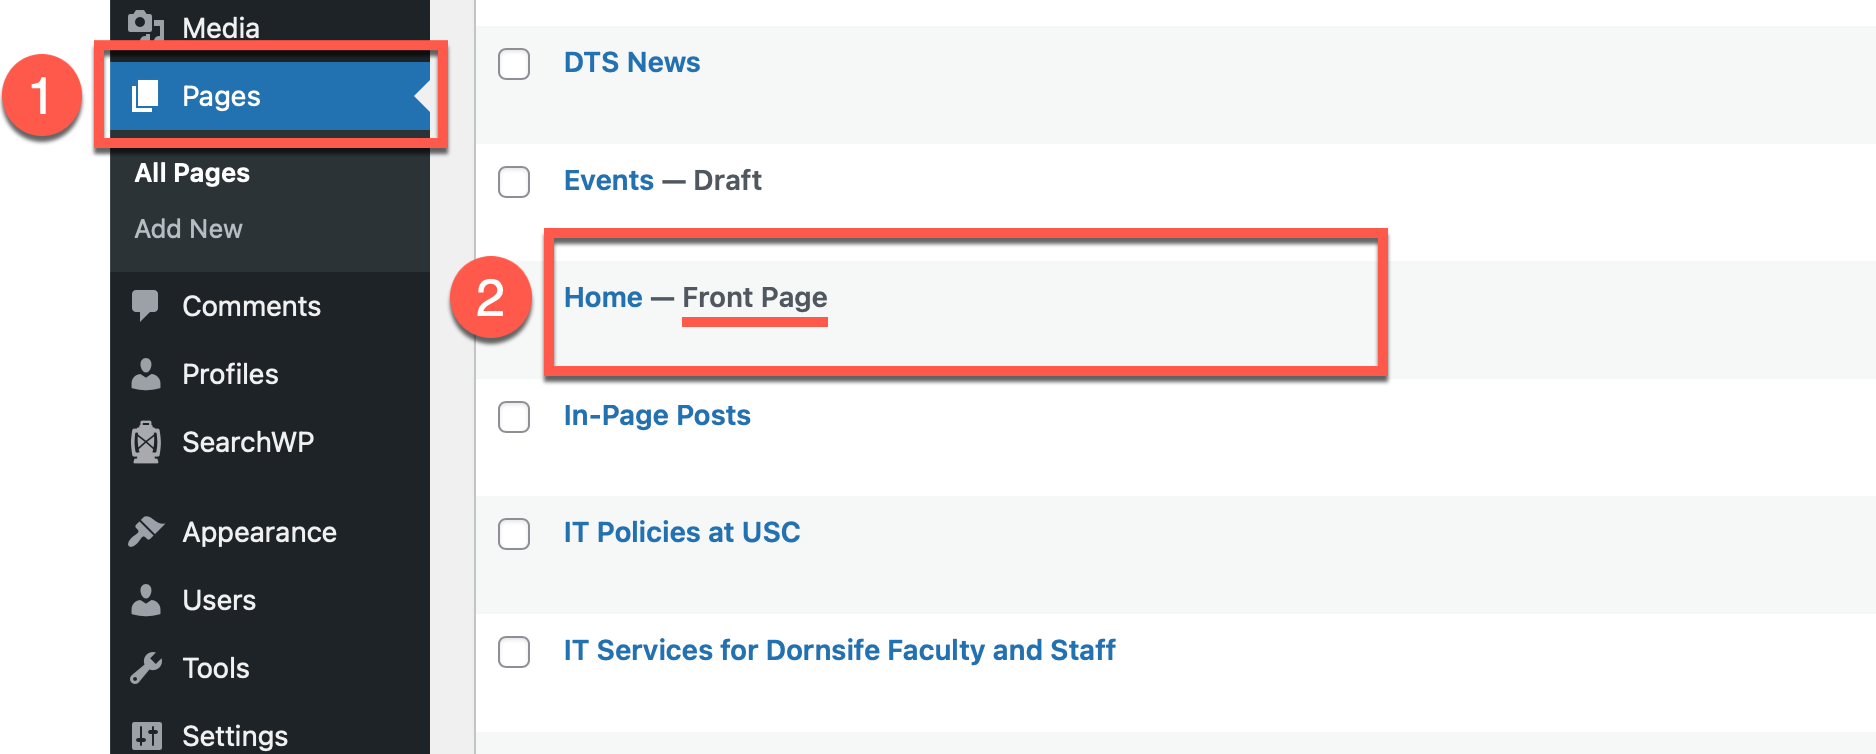
Confirm the homepage is set and has a featured image
To set your homepage
The homepage is the first page that visitors see when they go to your department or center’s website. To find out which page is set as your homepage:
- In the left menu, click Pages.
- Look for a page title with the label “—Front Page.” The title may not necessarily be called “Home.”
- If you want to change the homepage to a different page, follow our guide: Setting a homepage/Front Page.
To set the featured image on a homepage
- Open your homepage in the editor.
- In the Settings sidebar, click Set featured image.

If you do not set a featured image, your homepage banner will not display correctly.
Verify contact information
Verify that contact information listed on your website is accurate.
It may be better to provide a departmental email address or office phone number when possible, rather than an individual staff member’s information. If the staff member later departs, you must remember to manually update all instances where their contact information is present on your website.
Post-launch: Ensure all links work
You should check that all links on your website work prior to going live, but to be safe we also encourage checking all your links after the website launches.
Contact Us
Dornsife Technology Services
835 Bloom Walk, SHS 260
Los Angeles, CA 90089
Hours of Operation
Weekdays, 9am–5pm